📝 También disponible en español:
La técnica que todo carpintero debería dominar: Cola de milano
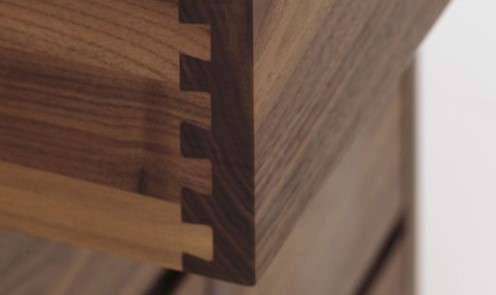
Hello! Today I want to share with you one of the most classic and beautiful techniques in carpentry: the dovetail joint. If you've ever seen those old drawers that seem built to last for generations, you probably noticed those little "tails" that stick out at the corners. That's the magic of this joint. Not only is it strong, but it also adds a handmade touch that stands out for its care and detail.
Let's learn how to do it, step by step, and don't worry if it’s not perfect the first time. The important thing here is to enjoy the process, and with practice, you’ll master this technique like a pro. Let’s get to it!
What do you need?
Before you start, make sure you have the following:
- Two pieces of wood (I recommend using hardwood because it lasts longer and looks better).
- A coping saw (the one that cuts very finely and precisely).
- Well-sharpened chisels (if they're not sharp, they won’t cut, they’ll just break the wood).
- A ruler and a pencil to mark everything.
- Clamps to keep the pieces fixed.
- Fine sandpaper for finishing.
Ready? Let’s do this!
Prepare the piecesFirst, make sure the pieces of wood are straight and square. If they are a little twisted, no worries, you can plane them a bit to correct them. This is important because if the pieces are not right, the joint won’t be either.
This is the fun part: designing your dovetails.
Choose which piece will have the tails (for example, the sides of a drawer).
Use a ruler to divide the edge into equal sections. There are no strict rules here: if you want wider or narrower tails, go for it! It’s your project, add your personal touch.
Draw the diagonal lines from the points you marked to the line where it will join with the other piece. This is where the joint starts to take shape.
Note: One thing that has worked well for me is shading the parts I’m going to remove. It's not mandatory, but I consider it a good practice, especially to avoid mistakes. Sometimes, when we repeat the same work over and over, it's easy to cut where we shouldn't. Believe me, marking those areas can save you more than one headache. 😉
Cut the tails
Now comes the manual work. Secure the wood with a clamp, and with the coping saw, cut right along the diagonal lines you marked. Breathe, take your time, and remember that precision is more important than speed.
When you’re done, use a chisel to clean up the leftover sections. Work carefully, tapping lightly so you don’t splinter the wood.
Place the piece with the tails on top of the second piece, aligning them properly.
With a pencil, draw the outline of the tails on the second piece. This will be your map to know where to cut.
This step is a bit like a puzzle. Cut with the coping saw along the lines you marked, but only to the depth you need. Then, with the chisel, remove the material between the lines until the tails fit perfectly into the cavities.
It's normal that at first they don’t fit perfectly. Take your time to adjust with the chisel. Every small detail counts.
When the pieces fit well, do a dry run without glue. If they are a little loose, you can adjust them with a bit of wood glue when assembling. But ideally, they should be tight on their own.
Recommendation: If you're still not very experienced, I suggest you start by practicing on scrap or leftover material. This will give you confidence and help you perfect the technique before working on your main project. It's better to make mistakes here than on the final piece! 😊
Why will you love this joint?
The dovetail joint is not only functional but also a detail that screams quality. You can use it for drawers, decorative boxes, or even frames. And the best part is that, every time someone sees it, they’ll know there’s a passionate carpenter (you!) who took the time to do it right.
So, what do you think? Are you ready to give it a try? If you have any questions or want to show me your progress, feel free to message me! I’d love to see your projects and help you along the way. 😊
Follow me.

.png)
.png)
Comments
Post a Comment